A complete beginners guide to papercraft /Pepakura (Windows only)
Introduction
Paper is a wonderfully versatile material with a long history that can be traced to AD 105, when a Chinese Emperors official attached to the imperial court, Ts’ai Lun created a sheet of paper using hemp waste, mulberry and other materials. With the complete history of paper now out of the way I can continue with my complete beginners guide to paper-craft, after all, you’re not here for a history lesson are you? Chances are, you’re here because you want to start making paper models for your own enjoyment or you are looking to embark on the first steps in creating wearable armour, helmets, masks etc… that you can display, wear to conventions, fancy dress parties or even sell.
while there are other guides on the internet that cover paper-crafting, I’ve not managed to find one that goes into as much as detail as I am going (to attempt) to do and it comes from the perspective of someone who is also a beginner to paper-craft. That being said, I encourage everyone’s feedback so that I can update this guide with information from more experienced users so we can all benefit from it. The most active community of paper-craft (as well as other material crafts) that I have come across has to be the replica prop forums, so if you haven’t already signed up then go do it after you’ve been through this guide, it is full of very experienced users and some fantastic resources. Also go check out the 405th Infantry Division and sign up there too. Finally I recommend that for every project you attempt, you document the process, take progress photos, completed project pictures and share it on the forums as it will benefit the community and yourself by serving as a reminder of the techniques you’ve used, other users can provide advice for future projects and you can warn others of any pitfalls you encountered.
The main aim of this guide is to build an understanding of what you need to make something out of paper; the essential equipment you need, what types of paper to use, the software Pepakura and how it works. Before I start listing the equipment you need, please be away that if you own a Silhouette CAMEO cutting machine there is a version of Pepakura viewer that supports this for $15 meaning you can skip the equipment list and more straight onto Part 3: Paper section of this guide.
Part 1: Essential Equipment
1: Cutting Mat

Cutting Mat: Click to enlarge image (opens in a new tab)
Unless you want to destroy your furniture, you’re going to need a cutting mat. When I searched online (19th April 2014) I found via Amazon UK that prices varied from between £1.90 (about $3.20) to a ridiculous £184 (about $310).
- First thing you’ll want to decide on is what size of mat you want which is going to depend on the amount of space you have available to you, so here is a quick breakdown. I have listed the size of the paper first then the typical size of the cutting mat in brackets after it.
A3: 297mm x 420mm / 11.7″ x 16.5″ (300mm x 450mm / 11.8″ x 17.7″).
A2: 420mm x 594mm / 16.5″ x 23.4″ (450mm x 600mm / 27.7″ x 23.6″).
A1: 594mm x 842mm / 23.4″ x 33.1″ (600mm x 900mm / 23.6″ x 35.4″).
A0: 841mm x 1189mm / 33.1″ x 46.8″ (900mm x 1200mm / 35.4″ x 47.2″).

Paper size chart: click to enlarge image (Opens in a new tab)
- Second is if you want a single or double sided mat, obviously the double sided mats willl last longer as you can simply flip it over and it’s like you have a new mat but they will cost a bit more.
- The third decision is if you want measurements on the mat, double sided mats normally come with metric on one side and imperial on the other. This is more befeficial for measuring out fabric for costumes so take some time to think about future projects you might do and if this is a feature that you will need later on.
- The last point is whether to get a 3 layered or 5 layered mat. While I couldn’t find any details on the construction of the 3 layered mats, the 5 layered mat is constructed with a think PVC sheet on top, then a thicker softer PVC sheet, in the middle is a PVC hard board, then another thicker softer PVC sheet and finally another thin PVC sheet (which basically just makes them double sided). Also make sure that you get a self-healing mat, most are but just make sure it states that in the description of the product.
So those are you choices. Personally I have this mat which has served me well so far and looks like it will do for a long time to come, plus it was really cheap.
2: X-Acto Knife

X-Acto knife and blades: click to enlarge image (Opens in a new tab)
There isn’t really much to say about this, you’re going to need a knife to cut out the pieces of your model so go and buy one with a cap and lots of extra #11 fine point blades as constantly cutting out your model pieces will dull the blades and if you’re heavy handed you can easily snap off the tips of the blades (which I’ve managed a few times now). You can use scissors but most models have small intricate pieces that will need the X-Acto knife to get that degree of precision. X-Acto do a whole range of knifes, blades and accessories so check them out over at their website.
3: Ruler and a safety pin

Metal Ruler: Click to enlarge image (opens in a new tab)

Safety Pin: Click to enlarge image (opens in a new tab)
You’re going to need to score along various lines to make folds easier and a lot more precise. A 30cm/12″ metal ruler is ideal for this and scoring with a paperclip allows you to get a precise line without tearing the paper and nicking the edge of the ruler.
4: Pointed tip tweezers

Tweezers: Click to enlarge image (opens in a new tab)
There may be times when your fingers are too big to make a fold or part of your construction may require to get to an area that your fingers are too big to reach. Try and find some that don’t require too much pressure to squeeze shut.
5: Glue

PVA Glue: Click to enlarge image (opens in a new tab)

Glue Gun: Click to enlarge image (opens in a new tab)
A little bit of forward thinking is needed when considering glue especially if you are going to be using resin, bondo and fibreglass ( I will do a guide about these things once I’ve had some experience using them but at the time of writing I have no knowledge about either!). Over on the 405th forums they have a Pepakura FAQ which states that the glue to use in order of preference is as follows:
- Low temperature hot glue gun/pen.
- Super Glue.
- Electrical Tape (resin will not eat through much. use in place of duct tape).
- Other non dissolvable glues (other glues may work when you put the paper together but the resin will dissolve it when you fibreglass it and your model will fall apart in front of your eyes).
Don’t use:
- Clear Tape.
- Dissolvable glue.
- Duct Tape.
(Credit to user Sigma-LS of the 405th for this information)
Personally I have been using the acid free pH neutral PVA glue (pictured above). It dries clear and doesn’t yellow the paper (which is great if you are just making models rather than armour) and comes with a plastic/metal nozzle which allows precise control over the amount and flow of glue. If you get this make sure you clean the nozzle after each use as the glue will dry and you will need to poke a pin down there to unclog it. I currently have a work in progress and am doing some research on resin to prepare for the next stage and once I’ve completed this I will update this guide to reflect how the glue held up.
6: Printer
As long as you are not going to try and use cardstock that is heavier than 200 g/m2 (see part 3: paper for more information), then any printer should be sufficient. Over time and after more research I’ll update this section.
Part 2: Optional Equipment
If you have any recommendations for any additional equipment you use please let me know and I’ll include it here.
Part 3: Paper
This section is going to be a constant work in progress as there is a lot of variation but for this first draft I’ll try to keep it as simple as possible.
Basically you want to use cardstock between 160 g/m2 and 200 g/m2 and there are two ways to measure the weight of the paper you need to use. Outside of the US the grams per square meter (g/m2 or GSM) method is used, which means if a sheet of paper measuring 1 meter x 1 meter weights 120 grams then that papers weight is 120 g/m2. If a sheet of paper measuring 1 meter x 1 meter weighs 160 grams then that paper weighs 160 g/m2 and so on. With this system you will never run into a case where a heavier paper has the same or lower g/m2 number as a lighter paper. The higher the number the heavier the paper.
Now in the US the paper weight is measured in lbs and here is where some confusion can lie as a thick cardstock can be listed as having the same weight in lbs as a thinner lighter cardstock. There is a reason for this and it is based on three factors which are as follows:
- Paper grade: Different types of paper with their own characteristics.
- Base Ream: This is the size and paper count used to weigh a particular paper grade to determine the paper density (generally the manufactured size before the paper is cut into consumer product dimensions). For example, cardstock paper has an uncut dimension of 20″ x 26″ and the base ream size is 500 sheets, whereas textgrade paper has uncut dimensions of 25″ x 38″ and a ream of 500 sheets.
- Basis weight: The weight of a particular paper grade using the grades base ream size and count.
| Grade | Description | Base Ream | lbs | gsm |
| Cardstock | Heavyweight paper used for invitations, program covers, postcards, business cards, and paperback book covers Pre-scoring before folding highly recommended | 500 sheets 20 inches x 26 inches | 65 | 175 |
| Text | Lightweight paper commonly used for letterhead, envelopes, program insert sheets, and résumés Easy to fold without scoring | 500 sheets 25 inches x 38 inches | 118 | 175 |
| Bond or Writing | Strong, rigid paper used for letterheads and many other printing purposes | 500 sheets 17 inches x 22 inches | Bond:74
Writing: 118 |
175 |
| Index | Thin, inexpensive paper with a smooth finish, often used for business reply cards | 500 sheets 25 1/2 inches x 30 1/2 inches | 97 | 175 |
| Newsprint | Manufactured mostly from mechanical pulps specifically for the printing of newspapers | 500 sheets 24 inches x 36 inches | 108 | 175 |
| Bristol | Fine quality cardboard made by pasting several sheets together | 500 sheets 22 1/2 inches x 28 1/2 inches | 80 | 175 |
Part 4: Pepakura
This is where the real fun starts. Now that I’ve been over the materials you need, it’s time to talk about the software that brings everything together. First I’m going to go over what it is, where you can get it from and the system requirements then we’re going to work through a simple project which will give you hands on experience whilst learning about all the features of the software so lets get started shall we?
so what is pepakura?
Pepakura is a program developed by Tama Software Ltd. There are two versions of Pepakura, the first being Pepakura Viewer (current version 3.0.5a) which is the free version and the version which I will be covering in this guide. It provides a 3D viewing area that allows you to see the assembled model and view it from any angle and a 2D viewing area that shows the unfolded template of the model that is displayed in the 3D viewing area which can be printed off, cut out and stuck together to build the 3D model. As I said in the introduction there is a version of Pepakura viewer for Silhoutte CAMEO for $15 that comes with it’s own guide about how to use it with Pepakura. The other version is Pepakura Designer (currently version 3.1.3a) which allows you to import 3D data from software ( a full list of supported software can be found on the website) and create your own 2D templates from that 3D data. The current registration price is $38 so for now we will stick to the free version. There is also an upgrade of Pepakura Designer to a high resolution version but again I won’t be covering that in this guide.
Ok so now I know what Pepakura is, how do I get it?
All you need to do is click this link and it will take you to the main page, click on download on the left of the page then then on pepakure Viewer (Free) to take you to the download page (please note that you need Windows 8/7/Vista/XP to run it). Simply click the Download Pepakura Viewer 3.0.5a Installer (2.1MB) button at the bottom of the page and save it to your desired location. Once downloaded you can then begin the installation process by double clicking on the setup_pepakura_viewer305a_en icon and following the installation guide. Once that has finished, Pepakura will be installed and ready to open.
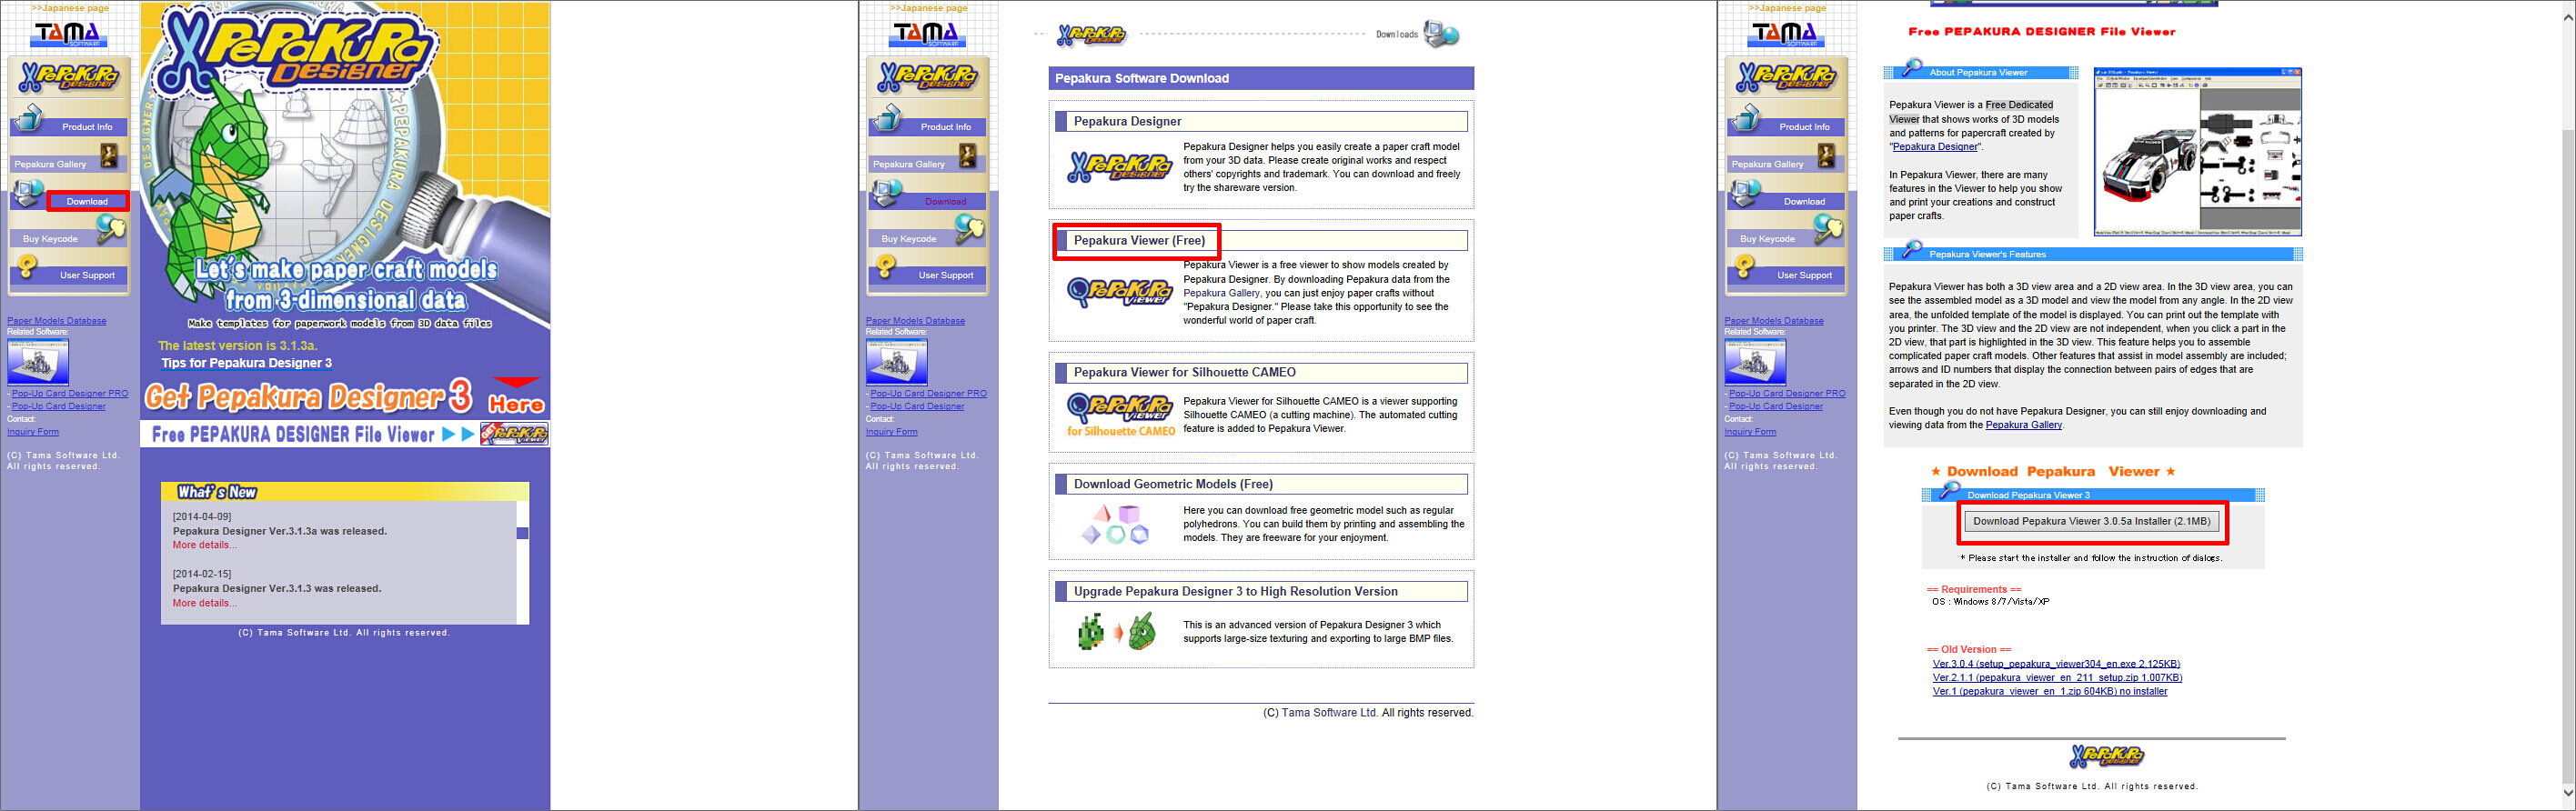
Pepakura Download Guide: click to enlarge image (opens in a new tab)
I’ve installed the program, now what?
Before you actually open it, you’re going to need to download some templates. Pepakura uses the file extension .pdo and there are many resources available to find these files such as typing into google model name pdo (eg Iron Man Helmet pdo), the replica prop forum using the search bar and the pepakura website has its own database. To begin with we are going to start out with something simple so head on over to the pepakura website, click on the download link then on the Download geometric Models (Free) link, this will take you a page with patterns for various shapes you can download. Scroll all the way to the bottom of the page and click on the Download[truncated_polygons.zip](30KB) link. Once it has finished downloading, extract the files and remember where you saved them to.

Downloading Shapes: Click to enlarge image (will open in a new tab)
Can I open the software now?
Yes you can, when you first open it up you should see the image below.

Default Pepakura page: click to enlarge image (opens in a new tab)
There are three ways to open and search for a file, first is by simply clicking the image of the folder in the top left of the toolbar, the second is by clicking on file in the menu bar and selecting open and the third is by pressing ctrl + O. Then simply navigate to the location of the file “truncated_dodecahedron.pdo” and double click to open it.

Opening a file: click to enlarge image (opens in a new tab)
Now that you have your first template opened up lets go over some basic operation.
3D model window:
Model Rotation: left or right mouse drag
Model Movement: Ctrl + Right mouse drag or press the mouse wheel and drag
Zoom in/out: Shift + right mouse drag or mouse wheel up and down
2D model window
Pan: left or right mouse drag
Zoom in/out: Shift + right mouse drag or mouse wheel up and down
Before we print off the template there are some settings we need to adjust and go over.

Toolbar
The first button on the toolbar highlighted by the black box is the set material to faces button. This switches between enabling and disabling the texture or colour on the faces of the model. I am going to be using a different model to show the functions of these buttons to highlight the differences.

Set Material To Faces comparison: Click to enlarge image (opens in a new tab)
The next button on the toolbar highlighted by the red box is the colour flaps with neighbouring faces button. This sets the texture or colours to slightly go outside of the lines in the 2D view. If you click on settings, then other settings and when the pop up box appears, click on the general settings tab you can than choose to tick the box listed as “paint flaps with neighbouring face colour instead of overflow paint”. Instead of setting the colours to go slightly outside of the lines it will actually just colour in the teeth on each piece.

colouring flaps with neighbouring faces: click to enlarge image (will open in a new tab)
the Next button on the toolbar highlighted in light blue is the Show edge ID button. In the 2D view, this switches between the edges of each piece being numbered and these numbered edges can be used as joining marks when being assembled. I only recommend turning these on if you are printing off a model that is white and one that you are going to go over with resin, bondo, paint etc. The next picture also shows that if you hover with your mouse over the edge of a piece, it will show a red line linking to the corresponding piece it needs to be attached to. You can also change the size of the font of the edge ID by clicking on setting, then other settings. When the pop up box appears, click the general settings tab and here you can change the font size.

Show edge ID comparison: click to enlarge image (opens in a new tab)
The next two buttons highlighted in yellow and dark green are the Emphasize open edges button and the turn on light button. The emphasize open edge button cuts the 3D model up into its individual pieces and the turn on light button renders the 3D model as being lit up. Now if you click on settings and open up the display settings of 3D model window and open up the other settings window you have some more options to play around with. First you can change the 3D model to be displayed in colour, white or white with shade. You can also set the mountain and valley folds to be coloured or black and in the other settings window you can change the colour of each of these types of fold lines, you can set the light to be on or off (this is the same as clicking the turn on light button) and finally there are two sliders one changes the size of the opening between the pieces of the model and the other changes the viewing angel of the model.

Edge and Light setting: click to enlarge image (opens in a new tab)
I mentioned mountain and valley folds so let me explain what they are. There are two types of folds you can do when making paper models, the first is the mountain fold which is represented as so _ _ _ _ _ _ _ _ _ then there is a valley fold which is represented as so _ . _ . _ . _ . _ . this picture below shows how you should make these folds.

Mountain and Valley folds: click to enlarge image (opens in a new tab)
the next two buttons highlighted in pink and dark blue simple display the page number and the part number of each piece in the 2D view.

Page number and Part names click to enlarge image (opens in a new tab)
the final two buttons highlighted in light green and orange simply switch between the dual screen mode and a single screen mode that shows only the 2D view.
With the truncated_dodecahedron.pdo file loaded in pepakura, make sure the show edge ID button and turn light on buttons are pressed, all the other buttons can be left off for now. All you need to do now is print off the template and you can begin building your first model.
Personally the first thing I like to do is use my ruler and safety pin to score along all the lines that need to be folded. Others prefer to do this after they have cut out each piece but it’s all down to personal preference and after a while and some experience you will find which method works best for you.

Scoring: click to enlarge image (opens in a new tab)
Once you have finished scoring along all the mountain folds, grab your X-Actor knife and cut along all the solid black lines. After a while you will get used to how much pressure you need to put on the knife to cut through the paper.

Cutting: click to enlarge image (opens in a new tab)
After you have finished cutting, push the piece out from the rest of the paper, you should have something that looks like the picture below.

Cut out piece 1: click to enlarge image (opens in a new tab)
The next step is to start folding. Personally I like to start by making sure all the tabs are folded first and then make the rest of the folds. If you’re not sure which way to fold it, refer back to the earlier part of this guide that goes over mountain and valley folds. This should leave you will something that looks like the picture below.

Folding: click to enlarge image (opens in a new tab)
Start to glue the model together. Match up each edge number and glue the tab to the underside of the matching part number which your glue gun/pen or superglue. Use the Pepakura software and hover your mouse over the edge of each part to help you figure out where each edge connects to using the red line. Once you glued all the pieces together you should end up with something that looks like the picture below.

Gluing: click to enlarge image (opens in a new tab)
You now have half the model finished. All you need to do is repeat the previous 5 steps with the second half of the model then glue both piece together and you will have completed your first Pepakura model. Congratulations!
I hope you’ve enjoyed making your first Pepakura paper-craft model. Remember to go check out the replica prop forums, the 405th forums and sign up to both. If after you’ve made a few more models and are feeling confident go check out the Spyro the Dragon model I made and give that a go, there is a link to the template in the post and should give you a decent challenge. Anyway good luck, have fun and happy crafting.

Pingback: Stocking Up For Your Crafting Hobby
Pingback: 101 Staycation Ideas for This Summer – Diet Solutions
Pingback: 101 Staycation Ideas for This Summer – ANC Today
Pingback: 101 Staycation Ideas for This Summer - JesseDotEarth
Pingback: 101 Staycation Ideas for This Summer – Digital Technology Real Estate Deal News
Pingback: 101 Staycation Ideas for This Summer – Digital Marketing Authority
Pingback: 101 Staycation Ideas for This Summer - Finsider.co - Make Money Personal
Pingback: 101 Staycation Ideas for This Summer – ONLINE EARNING HELP
is it possible to have the edge id printed out and the folding lines, but so that the printed lines are on the back of the paper, so inside the model and not on the outside?
I see you don’t monetize your website, don’t waste your traffic, you can earn extra cash every month.
You can use the best adsense alternative for any
type of website (they approve all websites), for
more info simply search in gooogle: boorfe’s tips monetize your website
Thanks for the tutorial. I was wondering if it is possible to introduce the paper thickness to Pepakura, say to craft something from 2 mm thick cardbox?
thank you very much that you share really useful gratitude teacher
Even 3 years and a pepakura version later, this is still perfectly relevant and useful! Thanks a lot!
Does it need A4 or A3 for the printing?
Pingback: Papercraft models and cut outs: Today’s Christmas holiday Google Doodle explained | TimeOutPk
Pingback: Papercraft models and cut outs: Today's Christmas holiday Google Doodle explained - News Planet
Hello admin do you need unlimited content for your page
? What if you could copy article from other blogs, make it pass copyscape test and publish on your page – i know the right tool for you, just search in google:
Ziakdra’s article tool